KNIME configuration
You can install and use seq-to-first-iso with the Analytics platform KNIME to process data from SLIM-labeling.
Requirements:
KNIME
conda
a little bit of Python knowledge
(Note: if you wish to use pandas > 0.23, you need to upgrade KNIME to 3.7.2 at least)
Set Python with KNIME
You need to install and configure a Python extension.
This guide is adapted from the 3.7 Python installation guide from KNIME.
Set up the conda environment
On Windows, if you want to use conda with the default command-line interface CMD, you need to do some configuration, else use Anaconda prompt (or any other interface that recognizes conda) bundled with conda.
If conda was not added to the PATH environment variable during the installation, you have to configure your shell to use the conda commands:
You can add the PATH to the folder containing conda, the command in CMD should look like:
set PATH=%PATH%;C:<PATH_WHERE_YOU_INSTALLED_CONDA>\Scripts
By default <PATH_WHERE_YOU_INSTALLED_CONDA> is C:\Users\<Username>\<CONDA_INSTALLATION> where <Username> is the Windows username and <CONDA_INSTALLATION> the conda installer used (e.g: “Miniconda3”, “Anaconda4” …).
This command only works for the current command prompt and you will have to type it again if you want to use conda in a new command prompt.
If you want CMD to always recognize conda, you will have to add conda to the system environment. One way to do it is with the command prompt:
setx PATH=%PATH%;C:<PATH_WHERE_YOU_INSTALLED_CONDA>\Scripts
Create a conda environment
In the GitHub repository, go to knime/environment-knime.yml and download the raw version of the file (Right click → Save as …).
Then in the directory where environment-knime.yml was downloaded open a shell/Anaconda prompt and use:
conda env create -f environment-knime.yml
Note: to move within folders with a shell use the cd command.
Now if you do
conda env list
you should see seq-to-first-iso-knime in the environments.
Create a start script (KNIME <4.0)
For versions of KNIME lower than 4.0, a launch script is needed.
Create a small script to start the conda environment by using the templates defined by KNIME.
In our case <ENVIRONMENT_NAME> is seq-to-first-iso-knime while
<PATH_WHERE_YOU_INSTALLED_ANACONDA> depend on the user’s conda configuration and operating sytem.
To test if your script works, try to execute it:
For Windows, double-click on it
For Linux/Mac, make your file executable
chmod gou+x <script_name>
then execute it with
./<script_name>
Configure the Python extension
In the KNIME interface, go to File → Install KNIME Extensions then search for Python Integration to find the KNIME Python Integration.

KNIME Python extension in the Install window
Now you just need to configure the Python executable KNIME will use.
Go into File → Preferences → KNIME → Python then in the Python 3 subsection, paste the absolute path to your start script.
e.g: Windows path C:\Documents\<script_name>, Unix path home/<user>/<script_name>.
For KNIME 4.X, you only need to write the path to the conda installation directory (your <PATH_WHERE_YOU_INSTALLED_CONDA>) and select seq-to-first-iso-knime in the dropdown menu for Python 3.
Next use Python 3 as default, then Apply and close.
If everything went alright, you should now be able to use Python script nodes with KNIME.
Use seq-to-first-iso with KNIME
Warning: the tutorial assumes you use seq-to-first-iso 0.5.0, functions in other versions might differ. If you want to use other versions, you have to make sure the changes across versions will not break your workflow.
The following steps are mostly examples, you can adapt them for your needs.
If the file is not parsed
You can use the parsing provided by seq-to-first-iso if you want to read from a formatted file (one sequence per line).
Create a Python scripting node by going in the Node Repository then Scripting → Python → Python Source. Then configure the node.
import seq_to_first_iso as stfi

# Parse the file, change <PATH_TO_YOUR_FILE> to your file path.
parsed_output = stfi.sequence_parser("<PATH_TO_YOUR_FILE>")
# Get rid of ignored_lines for seq_to_df.
parsed_output.pop("ignored_lines")

# List of unlabelled amino acids, change if you need.
unlabelled_aa = ["A", "C"]

# The name output_table will inform KNIME that
# the variable is an output table.
output_table = stfi.seq_to_df(unlabelled_aa=unlabelled_aa,
                              **parsed_output)
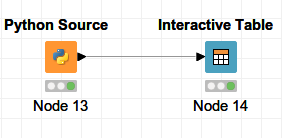
Minimal implementation of a Python node without prior input in KNIME
If peptides are already in a table
If you already have a table with peptide sequences, you can feed it to function seq_to_df() to get the output dataframe
Create a Python scripting node by going in the Node Repository then Scripting → Python → Python Script (1⇒1). The node will receive a table as an input.
from seq_to_first_iso import seq_to_df

# Copy input table.
output_table = input_table.copy()

# Set the unlabelled amino acids.
unlabelled_aa = ["A", "C"]

# If the input table has more than 2 columns
# annotations will be the first column while
# sequences are the second one.
# Else, we consider the only column contains sequences.
try:
  sequences = output_table.iloc[:,1]
  # Cast pd.Series to list.
  annotations = list(output_table.iloc[:,0])
except:
  sequences = output_table.iloc[:,0]
  annotations = []

output_table = seq_to_df(sequences, unlabelled_aa, annotations=annotations)
In the example above, you may also chose which columns to take into account as arguments for seq_to_df().
e.g: The fourth column of your table has lists of post-translational modifications, you can capture the column in a variable with ptms = list(output_table.iloc[:,3]) then use the variable output_table = seq_to_df(sequences, unlabelled_aa, modifications=ptms).
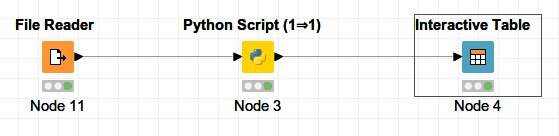
Minimal implementation of a Python node with table input